Create Shape - Smooth
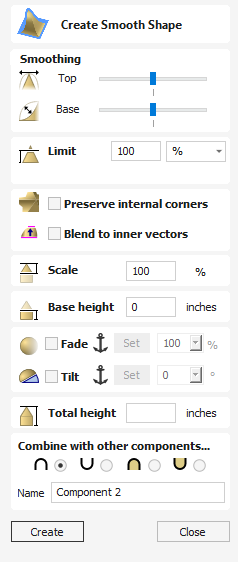
The Create Smooth Shape tool creates a 3D model component that has a smooth curve at the bottom and top of the model creating an S shape.
 Smoothing
This determines how much of a curve the smoothing has on the top or bottom of the model.
You can use the slider bar to edit the angle of the curve used for the smoothing at the top and bottom of the model, having the slider bar closer to the minimum will create a more concave curve and the maximum will give a more convex curve.
Scale
This limits the height of the shape by scaling the shape up or down while retaining its general specified profile. It is scaled to the height entered in the Height area of the form which becomes available once this option is selected. The slider can also be used to change the final height.
Base Height
Specifies the height of a flat 'base plane' added below the profile you have chosen.
Fade
When this option is checked ✓ the user can fade the Z depth of the Component. The first part of this operation (once the option is checked ✓) is to select the Set Anchor button - then click two points in the 2D view. The first click specifies the point which will remain at the current height. The second click specifies the point that the Component will be faded down toward. The shape will fade down from the first point to the second by the percentage selected.
Change the strength of the fade by clicking the down arrow next to the percentage value and using the slider to move this up and down or type in a specific value for the amount you would like to reduce the depth by. The fade will be applied linearly between the two selected points. This is a useful tool for giving the effect of a Component fading into the distance to help with overlapping areas of Components if you want to lower an area to give it the appearance of going behind another one.